Documentation structure
Topics
Documentation structure - Hierarchy
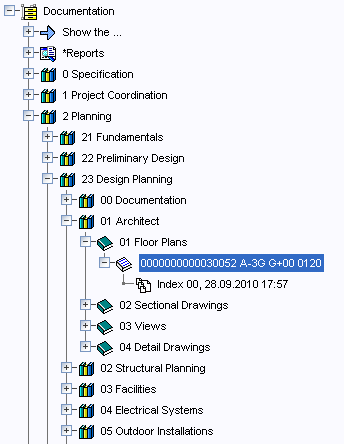
The documentation structure follows a fixed hierarchy. The top level is represented by cases , wherein any number of cases can be created
below a case. One level below, the folders
are located. Below the folders are registers, and
the registers contain documents. We distinguish between registers for documents (doc, xls, jpg
etc)
and registers for CAD documents
(dwg, plt etc)
. CAD documents are
not placed directly into a register. They additionally require an index which indicates the
planning status.

Empty parts of the documentation can be displayed in grey and in italics. This makes it even easier to find documents in the documentation.
By specifying a category, the symbols may differ from the standard symbols, depending on the configuration.
Creating document registers
Document registers are used for filing documents. To create a document register, go to a folder
and click on .
In the following dialog, choose a name for the register, the register type (optional) and the
code (optional). The owner is preset, but may be modified by clicking on .

Apply the settings by clicking on Create.
Now you can upload documents into the newly created register.
Creating drawing registers
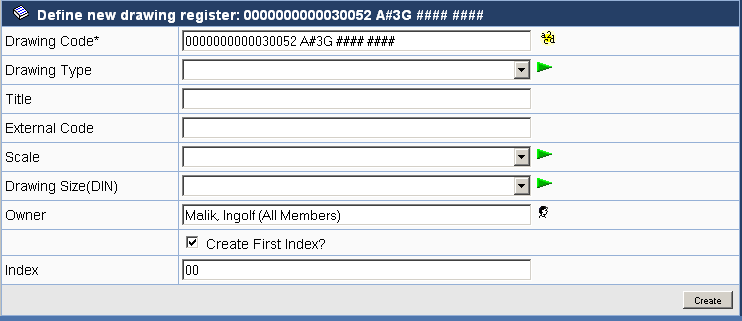
Drawing registers are used to file CAD documents. To create a drawing register, navigate to a
folder and choose .
In the following dialog, complete the code in the field Drawing Code or specify a name if no code
is used. owner is preset, but may be modified by clicking on .

When creating the drawing register, the first index should be created as well, since CAD documents can only be filed in indices.
Apply the settings by clicking on Create.
You can now upload CAD documents into the indices of the newly created register.
Moving / Copying document registers
In order to move or copy one or several document registers, place them on the clipboard using the
button .
Now navigate to the target folder and choose
in order to insert from the clipboard.

Choose if the registers should be copied or moved and click on Insert.
When copying document registers, next you can choose whether the documents contained in the register should be copied along with the register or not. If only a single document register is copied, you can specify a new name for it. In order to be able to copy, you must possess write access at the target location.

When moving a document register, the register is deleted at its original location and is inserted at the target location with its contents. In order to be able to move the register, you must possess delete access at the original location and write access at the target location.
Moving / Copying drawing registers
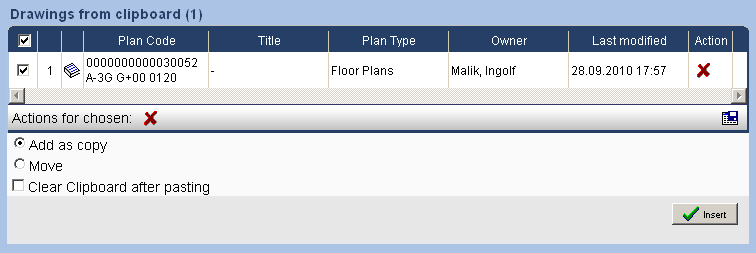
In order to move or copy one or several drawing registers, place them on the clipboard using the
button .
Now navigate to the target folder and choose in order
to insert from the clipboard.

Choose if the registers should be copied or moved and click on Insert.
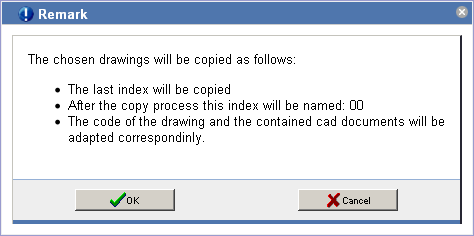
When copying one or several drawing registers, only the last indices are transferred and are renamed according to the configuration for new indices. In the copied index, the original index is recorded as the predecessor. Therefore, tracing is possible. In order to be able to copy, you must possess write access at the target location.

When moving a drawing register, the register is deleted at its original location and is inserted at the target location with its contents. In order to be able to move the register, you must possess delete access at the original location and write access at the target location.
If the target location has a different code, you will be asked to adapt the code accordingly.
Moving folders
In order to move one or several folders, place them on the clipboard using the button .
Now navigate to the target case and choose
in order to insert from the clipboard.

When moving a folder, the folder is deleted at its original location and is inserted at the target location with its contents. In order to be able to move the register, you must possess delete access at the original location and write access at the target location.
Copying a folder is not possible on the PlanTeam-SPACE.